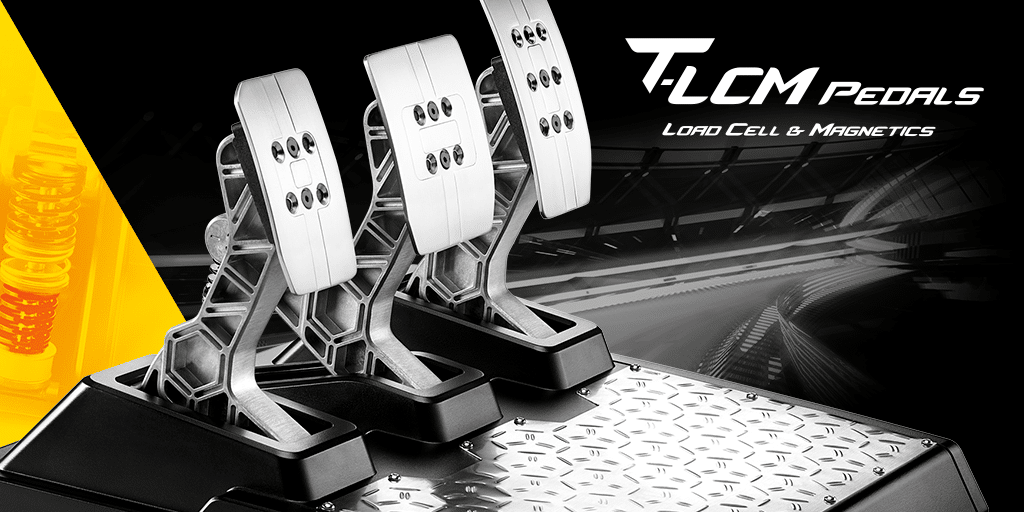
The Thrustmaster T-LCM pedals are the latest and greatest pedals in the Thrustmaster line-up. In a first from Thrustmaster, their T-LCM pedals feature a high-quality load cell sensor. This means that they perfectly measure and transmit the force that you apply.
These top of the range pedals are perfect for simulators like Assetto Corsa Competizione where precision is crucial, and so it’s only viable to have them set up perfectly. So, this is how to set up the Thrustmaster T-LCM pedals best for ACC.
Step 1: Mounting and connecting
The first thing to do after unboxing the T-LCM pedals is to attach them to your sim rig and connect them via the USB or direct wheelbase connection cable. Both of these are found as standard in the box, so there’s no need to buy them externally.
Due to the load cell sensors inside the brake module, the pedals have a class-leading maximum force of 100kg (220lb). To make the most of this feature, it’s more than advised to secure them to a sim rig, which is just as easy as securing any other set of pedals via the screws on the underside of the metal pedal plate.
To optimally connect your pedals, you should use the RJ12 cable found at the back of the set – which can be removed at any time – and connect it to the corresponding port at the back of your base. You must also connect the USB cable that is connected directly to your PC. To let you know they are correctly connected and fully recognised by your wheel, the ‘MODE’ LED on the bottom left corner of any Thrustmaster wheel will flash five times after standard base calibration.
Once the pedals are mounted securely and fully connected, it’s time to move on to the software stage of the setup process, where you can finetune them to your preference.
Step 2: Installing and adjusting the required software
The very first thing to do before downloading any new software is to check that your existing software is fully up to date in order to make sure that the T-LCM pedals are recognised by your wheel. Thrustmaster states that this is a common issue if your software is not up to date.
So to check this, you should open your Thrustmaster Control Panel, which can be downloaded here if you don’t already have it, and press ‘Check for update’ in the bottom right corner of the window. The latest firmware version is 31.
Once you have checked or updated your firmware, it’s time to download the dedicated T-LCM software. This allows you to make the most of the customisation that is possible and is another crucial step in optimising its usage as this is where your pedals are calibrated.

With this software, you can change three settings:
- The dead zones at the beginning of all three pedals
- The dead zones at the end of all three pedals
- The electronic brake force on the brake pedal
The brake force is shown to you by two values, the raw and final values. The raw value is exactly the force you put through the pedals, but the final value for the brake can be adjusted by the brake force value slider at the bottom of the window. The deadzones are shown by small yellow boxes at the start and end of the movement range, which can both be made bigger or smaller, depending on your preference.
This allows you to change how much force is recognised by games, whilst applying the same amount of force in real life. The real-life force is represented by the raw value, whilst the final value is the outputted value. For example, you can tune it so that 50% of actual force is recognised as 100%. This can become very useful if you struggle to put the required force into the pedal itself. However, at Coach Dave Academy, we recommend that you use the maximum force available as it allows for the most precise experience. To save your adjustments, the software will guide you on the procedure.
Step 3: Identifying the available springs
Another of the best aspects of the Thrustmaster T-LCM pedals is the interchangeable brake spring. This allows you to change the resistance of the brake pedal, either to make it softer or stronger.
It is best to adjust this after the original software setup so that you know the full range of default resistances.
Included with the T-LCM pedals, there are six different springs, which all have different resistances and can be paired with any other spring.
The six springs come in five different colours:
- White – The least resistant
- Dark grey – A softer but balanced resistance
- Black – A stronger but balanced resistance
- Red – The most resistant
- Silver – A pre-loading spring which allows for a softer
By default, the black, pre-loading, and red springs are installed.
Not only do you have this range of springs, but also five washers and two pairs of spacers:
- Washers – Small metal disks that can be dropped in the middle of the pre-loading spring which disables it
- Unmarked spacers – Separate the softest three springs from the pre-loading spring
- Red marked spacers – Separate only the red springs from the pre-loading spring
Step 4: Choosing and installing your springs
All five of these available springs allow you to customise the feel of your brake pedal, allowing for a progressively harder feel and even feel throughout, or a progressively softer feel. Choosing your combination can require some trial and error, but Coach Dave Academy’s professional racing driver, David Perel, and professional eSports driver, Josh Martin, both recommend that you use the strongest of the available springs on the bottom, and the black, third-most resistant spring, on the top.
To swap your spring combination, you simply need to go to the back of your brake pedal, compress the spring and bring the attachment head towards you. This detaches the brake arm from the pedal mount itself, allowing you to adjust the springs that are on the holding rod.
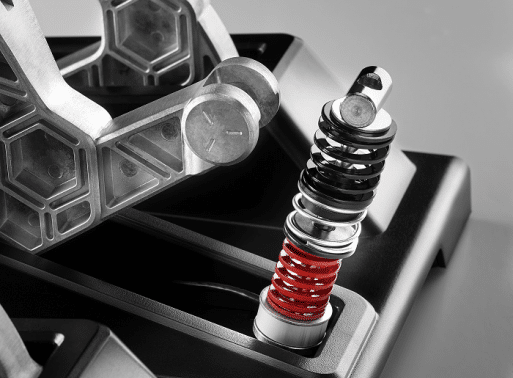
Remember, when swapping out the springs you must:
- Use the red marked spacers to separate the red springs from the pre-loading spring
- Use the unmarked spacers to separate the softer springs from the pre-loading spring
- Re-calibrate your pedals after a resistance change using the T-LCM software
Once you have made your final adjustments, you are ready to take to Assetto Corsa Competizione with the best settings for the highly regarded Thrustmaster T-LCM pedals.
Step 5: Mapping and Adjustments inside ACC
The very final part of the puzzle in setting up your Thrustmaster T-LCM pedals is done inside Assetto Corsa Competizione.
Here, all you need to do is map your braking input to the brake pedal itself. This can be done by heading to the ‘Controls’ settings, simply finding the brake input and clicking on it to enter mapping mode. Now, all you need to do is compress your brake pedal and you will be ready to go!
You may notice that there is a ‘Brake Gamma’ setting too, but this should be kept at ‘1.00’ because this is its linear setting. However, you can always adjust it to increase the brake pedal’s sensitivity.

