Photo mode in GT7 is a powerful tool, not only to immortalize your best racing moments, but also to satisfy your creativity and capture the beauty of your virtual machines with your own touch. GT7’s photo mode is not only the recreation of using a real DSLR camera, but also doubles as a photo editing software. Ignoring a few inconvenient real life constraints, this means your vision is unimpeded.
Photography Basics
Gran Turismo uses the same terminology and concepts as real life photography, replicating how the camera and lens work (while conveniently ditching some normally avoidable drawbacks). Photographers will instantly feel right at home, but a quick dive into the basics will help anyone who has never used manual settings on a camera.
The first element is focal length. On a technical point, it represents the distance between the center of the lens and the camera sensor. Practically, changing it modifies the “zoom”. To be precise, the higher the value, the closer the object will appear, and the narrower the field of view will appear. Lower values produce a deformation effect that is commonly referred to as fish-eye in the more extreme cases. 50mm is what provides the closest perception to the naked human eye on a full format sensor. The focal is the first thing you play with to frame the subject in the manner you want.
Focus is the point – or rather, plane – where objects will appear as sharp as possible. Physically, it is controlled within the lens by adjusting additional glass panes that act similarly to glasses would for your eyes. The plane of focus can get thicker or thinner depending on other factors: this is called depth of field. A reduced DoF can be used willingly for artistic purposes.
Exposure refers to the overall brightness of the picture. It is dependent on lighting and camera settings, and can be boosted by amplifying electric signals generated by the sensor. Exposure correction (labeled as EV) is something you can change either preemptively on your camera, or in post-production. Amplification however can produce noise: dots / pixels of the wrong color being generated in a way that produces a grainy texture on the image – noise is sometimes referred to as grain.
Aperture represents how open the lens diaphragm is. Its diameter, known as the F-stop, determines how much light will go through, affecting exposure, but also depth of field. The higher the value, the more closed the diaphragm is: this will result in a darker picture with an increased depth of field. For instance, F 1.4 will produce a brighter picture and make pretty much everything in front or behind the subject blurry, while the same picture taken at F 32.0 will be darker, but make the background sharp.
Shutter speed, as the name implies, is related to how long the shutter stays open (it is closed by default to protect the sensor and only opens to allow light to be captured when the user desires to take a picture). The longer the shutter stays open, the more light is being processed by the sensor, thus producing a brighter image. However, every movement happening during that time will result in objects being blurry on the final result. Slow shutter speeds can be used to transcribe the sensation of speed if you can effectively track a moving object through the lens, or be used for trailing light effects for instance. It is displayed in seconds or as a fraction of a second (for instance, 1/500).
Temperature corresponds to the “natural” lighting color and is measured in Kelvin. Over 5000 K is considered cool and will provide bluish tones, while temperatures below 3000 K are warm with a more yellow to orange hue. Colour cast is a byproduct of certain types of lights giving an unnatural hue affecting the white balance, and is usually undesired. It can be corrected or exploited artistically.
AI Coaching that actually works FOR Gran Turismo
Don't get lost in the data, instantly unlock lap time using our new real-time Auto Insights coaching. Elevate your GT7 braking, apex, and exit performance in record time.
Vignetting is a circular shadow cast by the lens body or accessories mounted to it, affecting the corners of the image. It is not noticeable on good lenses, but post production softwares can correct vignetting pretty efficiently.
Lens distortion and chromatic aberration are other side effects commonly suffered in photography. The photography can end up with warped objects and straight lines due to the lens rounded shape, and the refraction from the glass can produce colored halos in certain parts of the image.
Regarding picture composition, a safe way to ensure a good looking image is to follow the rule of thirds. Imagine the lines and intersection points resulting from your canvas being divided in 3 in both width and height (they can sometimes be materialized in your sight).
Rather than centering the main object of the photo, you want to have it be on one of those intersection points and / or use the lines to divide different planes for scenery photos. Moreover, if your subject has a “face” (this applies to cars), you generally want to keep it pointing towards the open space in your composition. This rule helps create dynamism and movement, but there are scenarios where you can choose to ignore it to play on reflections, symmetry, or simply just to fit all the subjects into the frame.
What Are GT7 Scapes
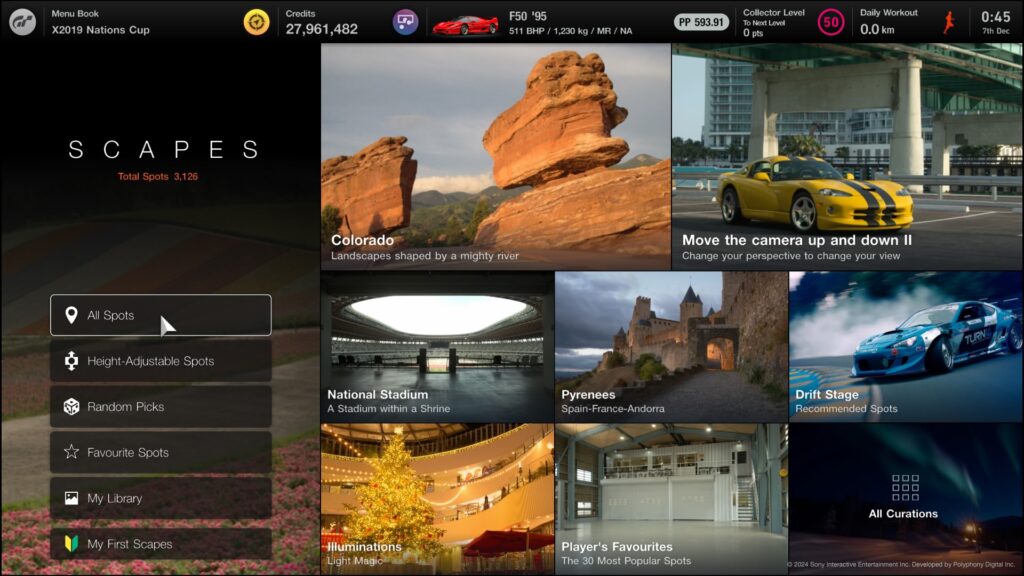
Scapes is a feature unique to Gran Turismo: instead of using a 3D environment, you are working within a real-life photography, in which you add cars – and your avatar if you wish to do so.
It is however far more than just photoshopping elements on top of a picture: GT7’s Scapes are captured with a complex multi-cameras and light sensors system allowing the game to alter the scene according to focal and angle. Then, an invisible 3D space is modelled with collision meshes and layered on top, preserving the correct perspective when moving elements, and even making the car shine and reflect according to light sources and elements surrounding it.
At the time of writing, GT7 features more than 3000 Scapes, with new ones regularly being added through updates. Some now even allow you to adjust the height of your camera for different perspectives. The Scapes menu provides thematic curations, but you can also sort them by different criteria, such as location, weather, time of day, and more. You can even shoot your cars in Tomica Town and pretend they’re toys!
Using The Camera
The camera features in Gran Turismo are pretty intuitive to use. Exposure is not affected by parameters other than EV and effects, so unlike in real life, you can freely change shutter speed and aperture to obtain the desired effects without having to worry about the picture becoming too dark or “burnt” (too bright).
Now, let’s follow the process of creating a picture. We will keep our focus on static photos initially, and dive into dynamics later. I have chosen to immortalize a Ferrari F50 in the Yosemite natural park.
The first step is to create a scene: select a car from your garage and position it where you want. Use the left stick to move it around, and the right stick to rotate it. You can also decide to adjust the steering angle to turn the front wheels, turn on the different lights on the car, add raindrops, change the position of active aero elements such as retractable wings, add brake glow and heat effects, and even add dirt, stains, and other wear effects. You can also decide if you want the driver seat to remain empty, or be occupied by a generic or your own avatar. You can generally place several cars into a single Scape if you wish, as well as placing your avatar standing outside of the car.
Once this is done, press R1 to switch to the camera tab (don’t worry, you can always come back if you need to change things). You now control the camera itself. The right stick is used to rotate the camera laterally and vertically, while the left stick allows you to zoom in or out and tilt the camera sideways. You can decide to invert the axis in Detailed Settings, where you can also deactivate the Horizon Click (I recommend to keep it turned on), and select the Rendering Quality. Camera Height, as the name suggests, allows you to bring the camera closer to the ground, but not all Scapes integrate this feature.
When your composition seems good to you, it is time to set the focus. If you’re not using Auto Mode, you will have to press the Square button to set it. By default, the focus point is in the center of the frame, but you can move it around by maintaining the Square button and using the left stick. You can also adjust the exposure correction and shutter speed from that screen, as well as select a different aspect ratio and switch from landscape to portrait format. I recommend leaving the grid on and keeping resolution on high.
Now you can shoot a picture by either pressing the Triangle button or moving the cursor to the “Shoot” icon. Depending on your hardware and settings, you may get a warning for rendering time. Don’t forget to press the Cross button once the image is rendered to save it.
Let’s have a look at my picture here:
With just a bit of exposure correction, low aperture and moving things around, I have created a decent static picture. But it could be more dynamic. So let’s go back to the Car tab and put our avatar in the car rather than next to it (note that removing your avatar here is optional, as long as it is not in the path of a vehicle).
The next step is to tell the game how fast we want the car to go. This can be done from the Car tab, or directly from the Camera tab as well by turning Panning Shot Settings on. If you have multiple cars on the scene, you have to pick one of them as a target for the Camera Tracking Rate setting. What that does is tell how synchronized you want the camera tracking to be with the car. For a “perfect” shot, you want to set it at 100%, but you can decide to drop it down a few percent for a more realistic, “natural” result. Note that from this point, shutter speed will have as much influence on the result than the car’s speed itself.
You might have to adjust speeds, steering angle or car position in some scenarios, as it is possible for the car to run out of space: in that case, a warning will pop up during rendering, and a ghost effect will occur. Check out the difference between a shutter speed of 1/60, 1/15 and 1/1 while my F50 is going at 80 kph (the car ran out of space in the last one).
It’s also possible to go further and use Drift Settings to control the path of your car more precisely. Of course, options to add smoke and make the car go properly sideways for a full on drift photo are there, but you can turn off smoke and have no counter-steering. With car speed being set at 1 kph, you can also create the illusion of a static burnout!
You can also take pictures from replays. To access photo mode during a replay, pause and find the Race Photos button on the right. From there, you are offered a set of predetermined camera positions you can’t move away from, an onboard camera, and a Walk Mode.
Walk Mode allows you to position the camera anywhere you want: use the left stick to move, the right stick to look around, and R1 and R2 to respectively move up or down. Then, press the Cross button to meddle with the Camera settings. If you selected Walk Mode, you can still move your camera position by maintaining R2 pressed while using the left stick.
You will find race photos are a bit different from Scapes in some aspects. Obviously, you have no influence on the speed and direction of vehicles, and autofocus is not available. You can deactivate visual damage and dirt but not add more. But the critical thing to understand here is the panning modes.
Mode 1 corresponds to a human photographer simply standing there and rotating their upper body to follow the movement of the target car. Mode 2 corresponds to a camera travelling on rails following the side of the track, without rotating on its axis. Mode 3 would be the equivalent of having the camera sitting on an arm mounted directly on the car.
The following images are the exact same, with the only difference being they’ve been respectively shot on panning mode 1, 2 and 3. Shutter speed is 1/30 to exaggerate the differences.
Effects And Editing
Let’s go back to our Scape photo to explore Effects, although the following applies to replay photos as well. From the Camera tab, press R1 to switch to the Effects tab.
At the top, you will find sliders to adjust temperature, colour cast and exposure. It is generally better to come back to those after working on Screen Effects. You can use one of the presets, or even import settings from a previous photo you saved in-game. If you want to craft your own, 3 slots are available for filters, plus an extra specifically applied on just the cars and avatar. For each layer, the degree of application can be changed and masks can be used to restrict the effect to specific parts of the image.
Each of these layers can be adjusted further via the colour tone corrections. It is an advanced menu with a lot of sliders controlling specific aspects individually for each primary light color. This can be quite complex and it is definitely not mandatory to fiddle with it, but it can also be very useful to make filters even more potent. Don’t be afraid to explore and try things to learn more and find your own style!
Finally, just below the filter presets and above the custom ones, you will find special effects that simulate phenomenons that usually happen with real life digital cameras. While they are generally considered undesirable by real life photographers, using these settings in Gran Turismo can help make your picture more credible and realistic. Or maybe your creativity can find other ways to use them!
Anyways, this is the final result I got, without even touching the more advanced options. Below it, the same before effects were applied, so you can compare easily.
Tips And Tricks
Once your picture is shot and recorded, you have multiple options to retrieve them outside the game. Go to Showcase from the main menu, and access your picture from your library. Selecting it will allow you to either share it – which will make it appear on your profile on the Gran Turismo website – or export it to your console’s gallery, from which you can then upload it to a USB device.
From that same menu, you can also open your photo in Scapes again, and modify it or change the car to take a picture with the same settings. If you have saved the image on your computer and don’t plan on doing anything more with it, you can also delete it to save storage space (it is high, but limited).
Delta is the first-ever telemetry tool for GT7 that gives you the ability to analyse your racing lines, braking and throttle management to gain lap time like never before.
If for some reason, you want to create a PNG image of a car or an avatar with a clear background, you can create a green screen around it by using a special effects layer to your advantage: turn Contrast and Highlight to 0, and bring Brightness to 500 for greens and 0 for the others (you can vary that if you need the background to be another color for your chroma key). You can then easily remove the background in your editing software of choice by isolating that color and deleting it.
Last trick, you can purposefully use excessive car and shutter speeds to create trailing lights effects. It works better with certain angles, and you will have to experiment to find a good middle ground, but the result you can get with night scenes makes it worth the effort.
We hope this guide will help you create interesting images and immortalize your best simracing moments. We would love to see you post your best creations in the SimGrid discord!


