iRacing, just like many other platforms, has a whole host of opportunities for you to show your creative flair in the form of screenshots. However, they aren’t quite as easy to set up on iRacing compared to the likes of Assetto Corsa Competizione and paired with its obvious graphics shortfall by default; there’s a bit more to do. So, let’s break down how to make the most of the iRacing engine and take the best screenshots possible.
Step 1 – Improve your graphics
Before we get to take the screenshots, let’s address the elephant in the room. iRacing is synonymous with that warm tint we all know and don’t really love, and that in itself really holds back the quality of your screenshots in almost every colour related area – even if you try to fix it with post-processing.
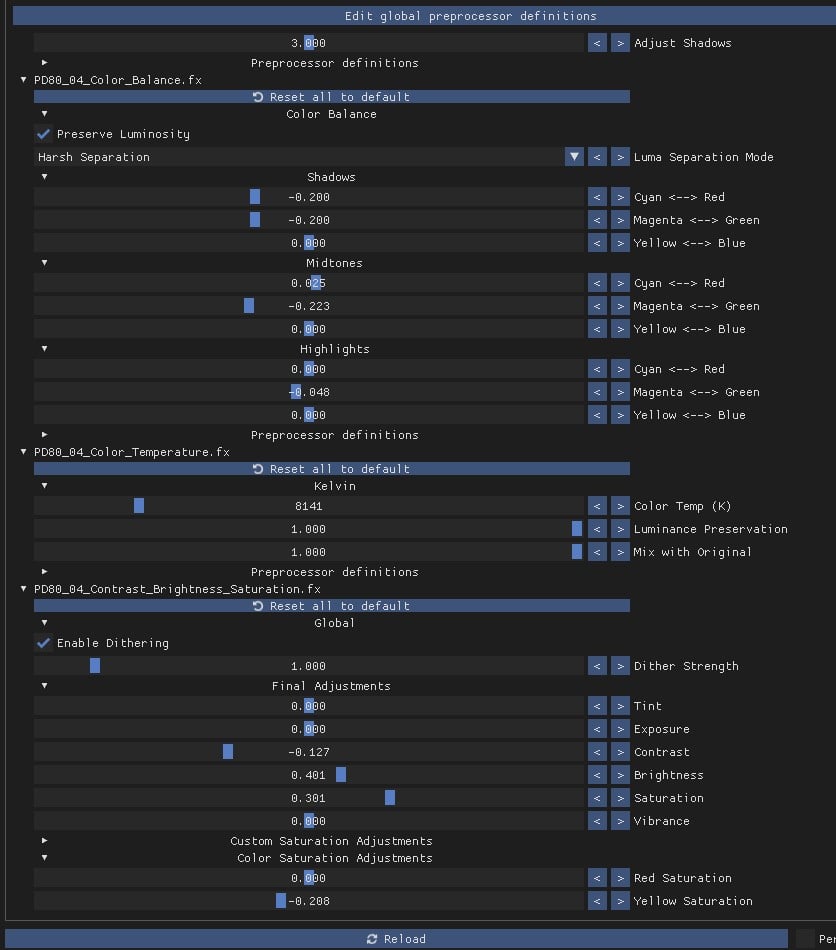
There are many ways you can go about this, but the easiest is to adjust your graphics through an app known as Reshade. Reshade works with many more games than just iRacing but is designed to enhance your visual experience. Setting it up is pretty straightforward (you could check out a tutorial from content creator Dan Suzuki if you want a full run-through), but you want to make sure that you have four key features enabled in it when installing it – Prod80 Colour Balance, Prod80 Colour Temperature, Prod80 ContrastBrightnessSaturation and Prod80 Filmic Tonemap. These will be most important for adjusting your graphics.
Within the Reshade window, which you can open whilst in an iRacing replay using the “Home” key by default, you can enable these and get adjusting. There are quite a few small adjustments we would recommend to get the game looking better, such as decreasing the temperature, decreasing the contrast and increasing the saturation, but here’s a screenshot with all the changes we recommend you should make. You can, of course, change it to meet your specific taste, but at minimum, this is an excellent place to start.
Step 2 – Adjust your replay settings
The final thing to do before you get to take your screenshots is to fine-tune your replay settings, although this is a pretty simple step.
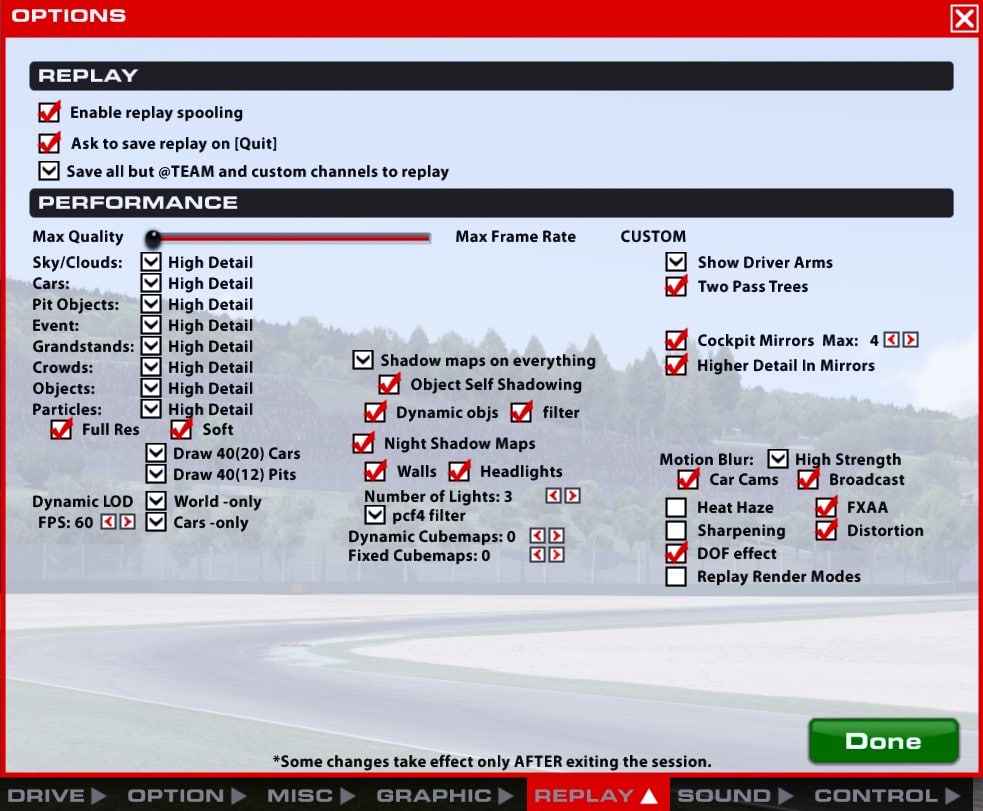
Navigate to the options tab in your iRacing replay and then find the “Replay” section, as here you’ll find all the possible adjustments graphics-wise. Simply whack all of your settings up to the max, as it’ll get your screenshots coming out the best way possible. However, the key part to note here is motion blur, which you should turn up to high strength.
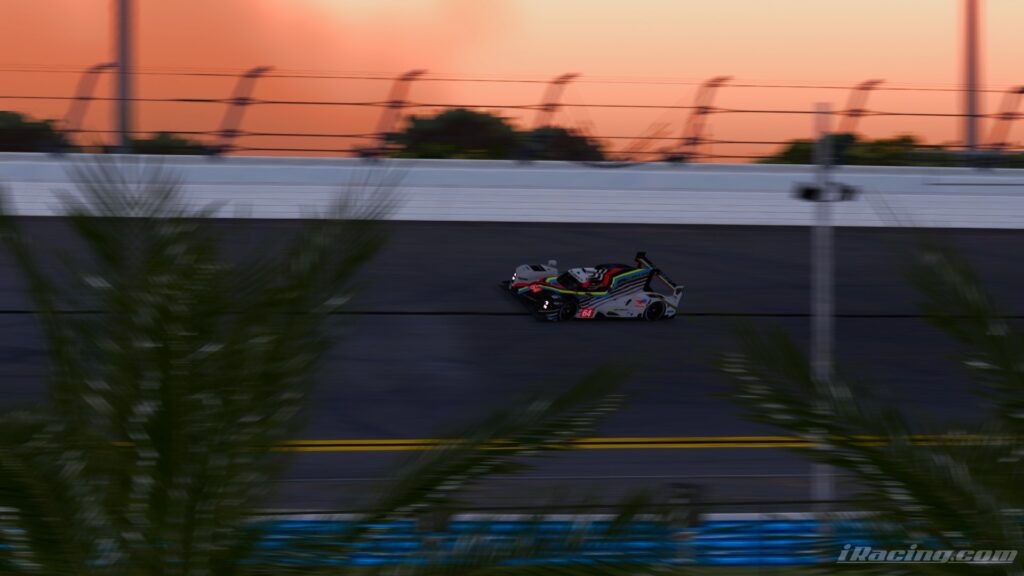
Motion blur makes your screenshots look far cleaner and more professional, meaning it’s an absolute must-have. You may not like it when you’re driving, but you don’t need to worry about that when you’re taking screenshots.
Step 3 – Select the camera you’d like to edit
There are quite a few different cameras that you can edit positions of in iRacing, but only a few make taking screenshots easy – the Chase Cam and the Scenic Cam. Having no free-cam like what you’d find in ACC, you have to edit these and set them up how you’d like.
The chase cam is ideal for taking close-range screenshots where you want motion blur at all times, giving you an effect far more like what you’d find in Assetto Corsa Competizione’s photo mode as these cameras are moving with the car, rather than shooting the car from a fixed position. However, it comes with some downsides, as you are more limited in adjustments as the camera is fixed around the centre of your car, meaning it can be a little awkward.
Meanwhile, the Scenic Cam should be your go-to for almost any other screenshot. It’s a mixed camera feed that follows no particular car by default, meaning it’s a perfect blank canvas for you to edit. Also, because it’s not moving with the car like the Chase Cam, you can get screenshots in the same way you would if you were a photographer, giving you the option to shoot realistically on another level.
Step 4 – Learn the image controls
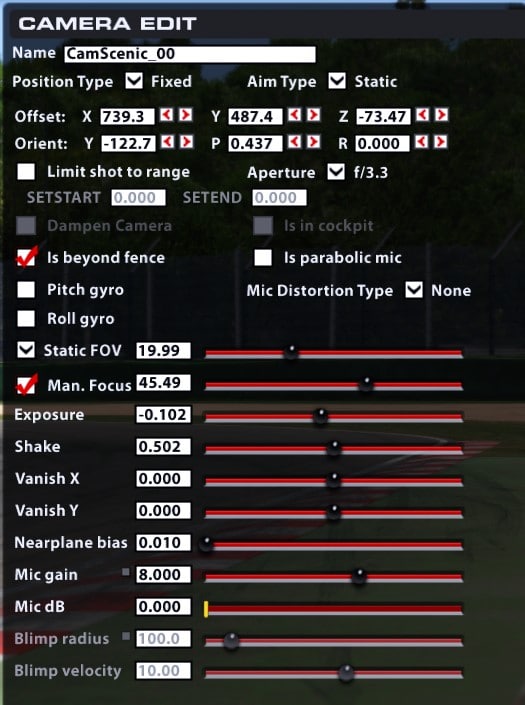
The iRacing Camera Edit menu is where you want to be to set up your shots, as this tool allows you to edit any and every camera available to you. Accessing it via hitting CTRL + F12, you will be greeted by a plethora of adjustments, so let’s run through them.
Moving the position of your camera
If you have chosen to run with a Scenic Cam as a basis for your screenshots, you’re going to want to move it all the way over to wherever your car is. You can do this with the standard W, A, S and D keys – W being forwards, S backwards, and A and D left and right. However, you are going to want to change more than this.
By holding the ALT key, you can now adjust the camera’s height using W and S, whilst A and D now tip your camera left or right hand down. Both are, of course, essential, but the latter can be used cleverly to create some amazing effects.
FoV and Zoom
Once you have moved your camera to the position you’d like, you can get going with curating your shot. The first thing that will come to mind is zooming in or out (depending on the shot you are looking for), and this is very easy to do, being controlled by a simple slider in the Camera Edit menu.
However, changing the Zoom value and changing the FoV value works differently – the prior uses the value inputted as a percentage and keeps that percentage of the shot filled by your car, whilst the FoV slider simply tightens or widens your Field of View. Zoom isn’t so helpful when taking screenshots as the car won’t be moving, so the effect it brings is essentially useless – think of it just as another way of lowering your FoV.
Aim Type and Motion Blur
As we mentioned earlier, turning on motion blur is essential when taking screenshots in iRacing. However, after making positional adjustments, you will likely notice that your car is maybe out of focus or there’s no obvious motion blur, but this can be fixed with two simple steps.
Your Aim Type, which can be found in the top-right of the Camera Edit window, should be set to “At Car”, so your edited camera will automatically pan with your car. Also, deselect the Dampen Camera setting found a few boxes above the FoV slider, and then just skip forwards or backwards one frame. Your car is in focus, and motion blur is back!
With the “At Car” Aim Type selected, you may notice that you can’t make as many adjustments as before, so flick back to the “Static” aim type, and you’ll be free once again.
Aperture and Focus
Especially useful if you are shooting from directly in front of behind a car, the final part of setting up a screenshot from a technical standpoint is blurring the background or foreground of your shot. Think of this as like glazing to your virtual cake, a finishing touch more than an essential.
The adjustable aperture controls the strength of the blur – the lower your aperture, the stronger it will be. You need to be careful here, though, as too low, and you may end up with what’s known as the “halo effect”, meaning you might get blurry areas at the edges of your car.
Meanwhile, if you tick the Manual Focus box under your FoV slider, you can adjust the position of the blurred area of your shot, essentially moving it closer or further away. Perfect for pictures with a busy background or a foreground such as a barrier, it gives you more control in making a finished screenshot.
On the note of barriers, if you reduce the Nearplain Bias setting further down your Camera Edit adjustment list, more of the objects close to the camera will be in the shot, meaning you can capture the barrier or close object without it being cut out.
Step 5 – Take the screenshot
Once you are happy with your shot, all you need to do is hit Space Bar to remove your heads up display and take the actual screenshot using whatever method you’d like. But, make sure you don’t use iRacing’s screenshot route, as your Reshade adjustments won’t show up.
Get creative!
Every track in iRacing has its unique features, and so does every car. Make sure you harness them as much as possible, taking advantage of every little winglet you could shoot through or every background building for that extra splash of colour. Keeping your screenshots full of exciting features ensures they are different and exciting in their way.
So, get out on track and see what you can do!


