Assetto Corsa Competizione is currently the most realistic GT car racing simulator and with this comes the most accurate representation of GT3 and GT4 cars. This accuracy is seen not only in the ascetics and sounds but also in the mechanical and electronic inner workings of the car. As can be expected this means every car has a huge range of adjustments that can be made to the car.
Finding the right adjustment for all the different parameters can be a difficult task. Simply understanding what each adjustment does and how this will affect you when driving on the track is something that feels like you need to be an expert in order to execute correctly. This guide hopes to give you the kick-off you need to begin your journey to be a setup engineer and get that extra bit of lap time out of your car
Can ACC car setups make you faster?
The purpose of a setup on any car within Assetto Corsa Competizione is to allow the driver to get the most pace from a car over a stint. This may not just be related to outright speed but also consistency over a whole race.
A driver will not see the benefit from a setup if its sole purpose is to produce the absolute quickest lap times every lap, as this may result in snappy handling or a car that uses up its fuel and tyres too quickly. If this is the case the overall pace over a stint will be reduced due to excess pit stops and time spent recovering from incidents.
A perfect setup will make you faster not just over one lap but across a whole session. Finding that sweet spot can be hard and is slightly different for every driver. Note that a fast setup for one driver will not also work for another.
Using this guide you should be able to create or tweak any setup to your liking and ultimately improve your pace and consistency as a driver.
Is Making Your ACC Setups Worth Your Time?
Depending on your free time availability (career, age, marital status and whether you have young children), you’ll understand how precious racing time is. While tweaking specific elements of your car setup can be extremely rewarding when you hit that perfect sweet spot for yourself, you can also find that you’re spending more time in menus than on the race track. Learning all the aspects of what affects your car’s handling is fantastic, but many of us want to rather spend our time racing in the limited time we have for our hobby.
That’s why Coach Dave has a team of experienced race drivers and engineers to do all the hard work for you and invest the time to get the most out of each car and track variation in ACC with their engineered setups. Either purchase per vehicle bundle, or get access to our constantly updated setups for ACC, iRacing and Le Mans Ultimate with our Delta Subscription, which includes our AI coaching and data telemetry app.
Otherwise strap in race engineer, there is a LOT for us to cover in this ACC setup guide.
Tyres
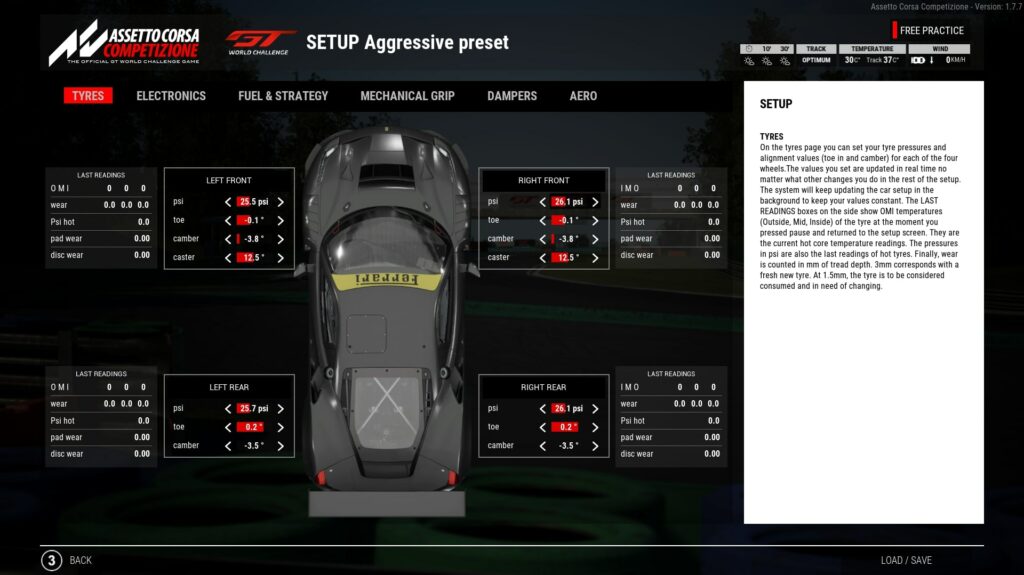
Tyres are some of the most crucial aspects of any car as these are the only piece of contact to the tarmac. If your tyres are not in the right window no matter how your car is set up you will never extract the most pace out of your car.
PSI
A tyre’s pressure is measured in pounds per square inch (PSI) and is a measure of the amount of air within the inner tube of your tyre. Within ACC, there is now only one tyre compound since the release of V1.9 – all cars run the 2023-spec DHF tyre no matter the class.
Dry
| Category | Compound | Pressure (psi) |
| GT3 | DHF (2023) | 26.0 – 27.0 |
| GT4 | DHF (2023) | 26.0 – 27.0 |
| TCX | DHF (2023) | 26.0 – 27.0 |
Wet
| Category | Compound | Pressure (psi) |
| GT3 | DHF (2023) | 30.0 – 31.0 |
| GT4 | DHF (2023) | 30.0 – 31.0 |
| TCX | DHF (2023) | 30.0 – 31.0 |
Temperature
When setting up the pressures within the setup menu this is under starting temperatures which will be around 65°C upon session start of pit exit. Optimal temperatures for the tyres are within 80°C – 90°C once on-track driving, however, tyres have a working range of 70-100°C in ACC V1.9.
It is worth taking note that under 70°C your tyres will experience a process known as graining. This process is caused by your tyre scrubbing through a corner and leading to tears within the rubber, which then re-seal when heat is generated back into the tyre. Above 100°C your tyre will experience a process known as blistering. This process involves the tyre overheating and the rubber breaking away in chunks and therefore damaging the tyres integrity. Both of these processes will reduce overall grip and tyre life and should always be avoided.
In addition to this factor, in-game temperatures can also be monitored in-game in three different sections. These are split into inside, middle and outside therefore breaking up temperature into three keys sections. The importance between these three sections is within the variation between each. The variation in temperature from the outside to the inside should never be above 9°C for the front and rear tyres.
Toe
Another important factor when looking at your tyres is the toe angle. What this describes is the angle at which the wheels are facing when looking at the car from above. A toe in angle makes the front wheels appear to be pointing inwards and a toe-out angle makes the front wheels appear to be pointing outwards.
In ACC adjusting the toe angle can help change the cars handling characteristics.
Having a toe-in on the front wheels will give greater stability on corner entry but can cause more understeer throughout the corner. Toe-in on the rear wheels will help increase the car’s stability overall.
Toe-out angle on the front wheels will cause the car to be more reactive to steering inputs but can lead to more oversteer from the car. On the rear wheels, toe-out will make the car unstable and is generally not recommended on any setup.
Camber
What camber describes is the angle at which the tyre will take when you look at the tyres head-on. This ultimately causes the tyres contact patch to be adjusted and therefore changing the grip levels of the tyre.
There are two terms to describe changes to the camber of a tyre and these are positive and negative.
Positive camber will move the top of the tyre away from the centre of the vehicle and the bottom of the tyre towards the centre. Negative camber does the opposite moving the top of the tyre towards the centre and the bottom of the tyre outwards.
Generally, there is a preference to run more negative camber of GT3 and GT4 cars as this will increase the contact patch of the tyre through high load corners. It must be noted though negative camber can cause the temperature to increase unevenly across the three sections of the tyre. When adjusting the camber make sure to keep the variation in temperature from the outside to the inside below 9°C for the front tyres and 5°C for the rear tyres.
Caster
The caster describes the angle to which the steering axis is angled forward or backwards from a side view of the tyre. In terms of handling characteristics, caster will affect the stability of your car and also adjust the weight feeling on the steering. Note that caster will also affect camber, a higher caster will lead to higher camber when the wheels are turned.
There are two key areas where performance will be affected by the caster and this is the braking zone and mid-corner. In the braking zone, caster will directly affect braking performance and mid-corner caster will potentially cause understeer if set too high.
Caster should be set at a high level until understeer is felt within a high-speed corner.
Electronics
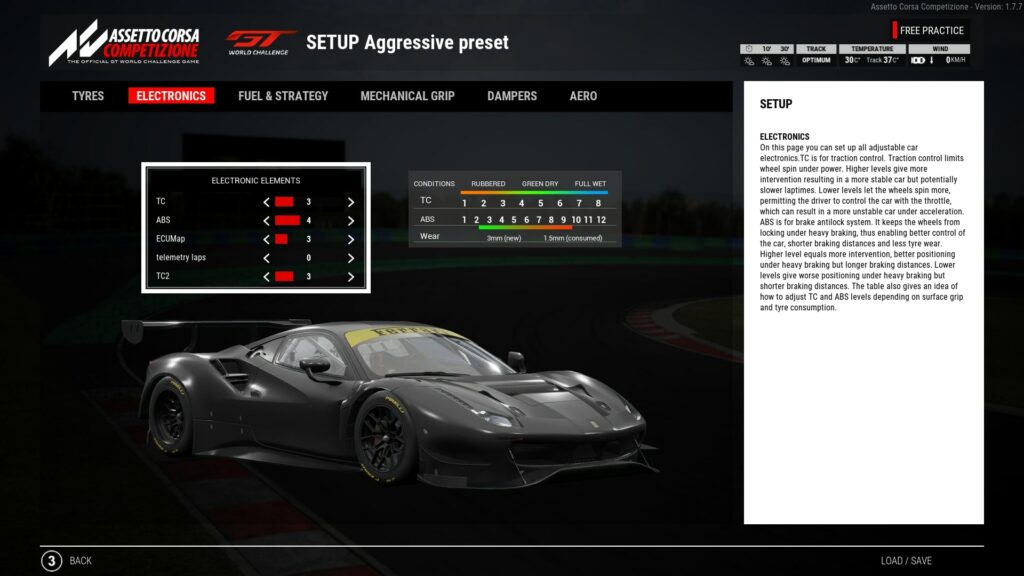
The electronics within Assetto Corsa Competizione refers to the assists and engine maps of the vehicle.
Traction control
Each car within Assetto Corsa Competizione has a different traction control system as these are produced by the manufacturer of the car. Generally, each car has one adjustable setting known as TC1, some cars may have a second called TC2.
- TC1 controls the amount of slip that the car’s wheels can have before the power is cut from the wheels
- TC2 controls the level to which the power will be cut from the engine once TC 1 has engaged.
- When adjusting TC1 and TC2 it is recommended to be within plus or minus one form each other.
Generally, the aim is to have these settings as high as possible before lap time is affected. The reason for this is that assists can help reduce excess tyre wear and also improve the speed of a driver throughout a stint by not over driving a car. Also for inexperienced drivers, these assists can improve the driveability of the car and reduce the chance of an incident or crash.
ABS
Anti-locking brakes (ABS) is a system that prevents the tyres under rotating and locking up during a braking zone. This setting, however, will not reduce the distance the car can brake within. The aim is to improve the car’s stability through the braking zone. This is a key area for GT cars due to their limited handling capabilities.
A higher ABS setting will allow the driver to brake deeper into the corner but this will lead to the braking zone becoming longer. A lower ABS setting will lead to a shorter braking zone but a more unstable car.
It is recommended to start with this setting at a higher value then reduce this down to as low as feels comfortable. In general, new drivers will need this value to be higher but an experienced driver will understand the car characteristics more and control the car’s stability better with a lower setting.
- All Pro GT3, GT4, GT2 Meta Setups in ACC
- AI Coaching for Sector by Sector Gains
- Pro Reference Laps to Compare to Yours
- The Best Telemetry App to Improve Your Lap
ECU Map
The Engine Control Unit (ECU) allows you to change the engine maps of the car. The ECU maps are settings for the car that will adjust factors such as; fuel consumption, throttle maps and power output.
The rule for most cars ECU maps is that the lower the setting the higher power and torque, however that does come at the cost higher fuel consumption. Each car will have a different range of settings but all will have several dry maps, wet maps and a pace car map. The general breakdown is
Dry condition Map
- Full power with highest fuel consumption and most aggressive throttle map.
- Full power with lower fuel consumption and a more gradual throttle map.
- Lower power with lowest fuel consumption and a progressive throttle map.
Wet condition Map
- Full power with high fuel consumption and a much more gradual throttle map.
- Full power with lower fuel consumption and a much more gradual throttle map.
- Lower power with lowest fuel consumption and a much more gradual throttle map.
Pace Car Map
- Lowest power with lowest fuel consumption, only to be used behind a pace car.
During a qualifying session, the only map that should be used is the one that gives the car the highest level of power available with the most aggressive throttle map. During a race, several settings can be used but during a sprint race, the same map as qualifying should be used. During an endurance race, you may need to fuel save so lower power level maps with less aggressive maps are likely to be needed.
It should be noted that each car will have a different range of values to refer to the developers guide to each car’s ECU map.
Fuel & Strategy
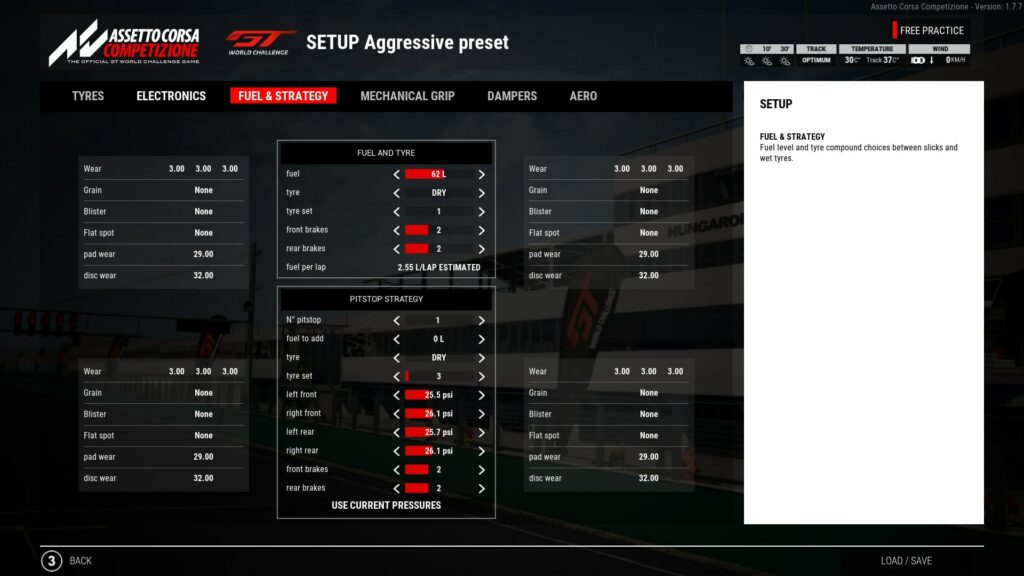
Fuel
This is one of the most important areas to get right when racing Assetto Corsa Competizione as this can lead to an early race end if not calculated correctly.
There are several different ways to calculate fuel needed for a race but the fastest way is to use The Sim Grid Fuel Estimator. The information you will need to get the most accurate result is
- Total race time
- Average lap time
- Total laps
- Fuel per lap
- Fuel tank capacity
If you’re short on time and need to calculate the fuel levels just before a race there is a simple equation that can be used
FR = ((TR x 60) / TL ) x FL + (2 x FL)
- FR – Fuel for race
- TR – Race duration in minutes
- FL – Fuel per lap
- TL – Average Lap Time
This equation will output a similar result to the calculator so keep in mind these are estimations.
Tyre and Set
This simply refers to the type of tyre you are using and which set of these tyres are fitted to the car.
For GT racing there are only two types of tyres DRY and WET, these are used in the conditions indicated by their names.
The tyre set indicates which set of tyres are fitted so before a race or qualifying make sure a new set, a higher number, has been fitted to ensure you do not start the race with worn tyres.
Brake pads
There are several choices of different brake pads within Assetto Corsa Competizione but only a few will ever be used.
The brake pad types are sorted by numbers so a driver can determine which pad to use depending on the session. It must also be noted these pads will vary between GT3 and GT4 cars.
Read our guide on choosing the correct brake pads in ACC here
GT3
Pad 1: Is used for short sprint race events, under 2 hours. These offer the best braking performance but the shortest useful pad life.
Pad 2: Is used for longer endurance events, over 3 hours. These still offer good braking performance and last much longer than other pads.
Pad 3: Is used for wet weather racing. This will offer moderate braking performance but will provide very good pad life. This pad will also work much better in colder conditions than other pads.
Pad 4: is used to mimic Pad 1’s wear characteristics but in an extremely short time frame. This pad is not ever recommended to be used unless you are practising your driving under extreme pad wear conditions.
GT4
Pad 1: Is a very short life span pad and is not to be used under any race conditions.
Pad 2: Is the best performing pad that will provide good performance in all conditions.
What pad to use and when?
Below is a table that indicates when each pad should be used on both GT3 and GT4 cars.
| Session Condition | GT3 Brake Pad Type | GT4 Brake Pad Type |
| Hotlap | Pad 1 | Pad 1 |
| Qualifying | Pad 1 | Pad 1 |
| Dry Race (Under 2 hours) | Pad 1 | Pad 2 |
| Dry Race (2-18 hours) | Pad 2 | Pad 2 |
| Dry Race (up to 24 hours) | Pad 2 | Pad 2 |
| Damp Conditions | Pad 2 | Pad 2 |
| Wet Race | Pad 2 | Pad 2 |
| Extremely Wet Conditions | Pad 3 | Pad 2 |
| Practice | Pad 1 – Normal Practice Pad 4 – Extreme Simulation | Pad 2 – Normal Practice Pad 1 – Extreme Simulation |
| Brake Wear Simulation | Pad 4 | Pad 1 |
If you are looking for an even more detailed description of each of the brake pads and their use then head over to The Coach Dave Academy’s guide on “Choosing the Correct Brake Pads in ACC”
Mechanical Grip
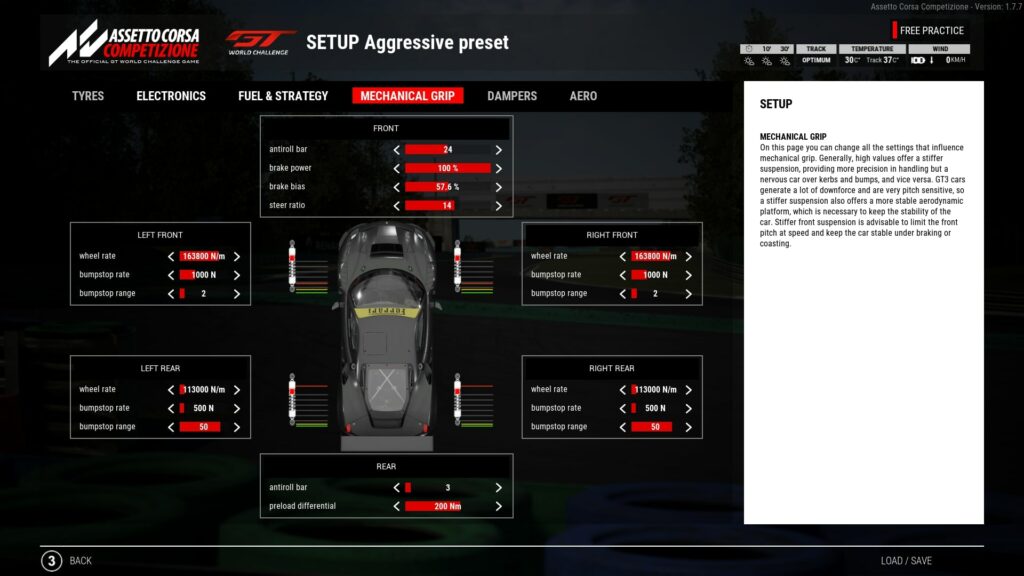
Partition Bar
A Partition bar, more commonly known as an anti-roll bar (ARB), is a torsion spring that connects the suspension of the car on each side and aims to reduce chassis roll. There are ARB’s at both the front and back of all GT cars and these can be adjusted differently to change the cars handling characteristics.
Front anti-roll bar
Adjusting the front ARB will lead to the most effect on the car’s handling. A lower value will soften the ARB softer and this will reduce understeer on corner entry. A higher value will stiffen the ARB and this will reduce oversteer on corner entry.
Rear anti-roll bar
Adjusting the rear ARB will lead to the most effect on the car’s throttle behaviour. A lower value will soften the ARB softer and this will reduce oversteer on corner exit. A higher value will stiffen the ARB and this will reduce understeer on corner entry.
Steering ratio
The steering ratio indicates the relationship between how the angle of the steering wheel outputs changes to the wheels of the car. For example, if we have a steering ratio of 15:1 then a 15° turn on the steering wheel will give 1° of angle to the wheel of the car.
It is not normally needed to adjust this setting unless you are having particular issues with the way your steering input is causing the car to behave. However, this issue is more likely related to your steering lock setting. The Coach Dave Academy has prepared a guide on steering ratios and lock that will help you understand the relationship and help you solve these issues.
Brake Bias
Brake bias refers to the distribution of braking force between the front and rear brakes. This value is indicated in a percentage, above 50% indicates a front bias and below indicates a rear bias.
Generally, a front brake bias will give the car more stable characteristics under braking and can induce understeer on corner entry. A rear brake bias will give the car reduced braking stability and can induce oversteer on corner entry.
When making adjustments to this setting it must be noted default bias is already relatively good for most applications. Adjustments to bias during a race should be made to keep the car balance consistent, changes in fuel levels, track conditions or tyre life will change the balance to the car.
Differential
The differential is the mechanical system that controls the rotational speed of each wheel. In GT cars the differential allows variation in speed between each of the wheels, as the inner wheel in a turn will rotate slower than the outer wheel. The outer wheel rotates faster as it has to cover a longer distance throughout the corner.
In GT3 regulations, the degree of differential lock under acceleration and release are fixed by homologation rules. The only value that can be adjusted is the preload of the differential. The preload is an adjustable spring that affects the differentiation in torque between the two axle shafts.
A lower preload value will lead to a more agile car during cornering, induce more oversteer on corner entry and provide more linear acceleration.
A higher preload value will make the car more stable on corner entry and more oversteer bias on exit and lead to a less linear acceleration curve.
The effects of changes to the preload can be further broken down by the speed at which you take a particular corner.
With most corner types, a high preload will lead to a more stable car upon brake release but provides less traction and potential understeer on the power. A lower preload will produce oversteer upon brake release but potentially less understeer under acceleration.
Wheel rate
Wheel rate refers to the amount of force that is needed to compress the suspension fully to its limit. What the adjustable value refers to is the spring stiffness that is applied to the car.
Each car will have a slightly different overall weight so spring stiffness needs to be different. With GT3 cars being quite aero dependent, spring stiffness can have a large effect on keeping the aero platform stable. It is also important to note the weight distribution as a front-engined car will have more weight over the front springs than a mid-engined car.
Adjusting this can be a complicated process and is recommended to be adjusted in small increments to feel the effects it has on the car’s handling and power delivery.
Bumpstop
A bumpstop is a rubber-like ring that is located above the suspension that limits the travel of the suspension.
Rate
The bumpstop rate indicates the stiffness of this rubber. Changes in this stiffness will lead to different characteristics of the car when the full suspension travel limit is reached. A softer bumpstop rate will lead to a smoother reaction to full compression and vice versa for a stiffer bumpstop rate.
Range
The bumpstop range indicates the amount of travel the suspension will have before the bumpstop is hit. This factor also relates to the wheel rate and ride height as these could also have effects on suspension travel.
When setting the range a basic principle to consider is to apply stiffer springs on smooth tracks and softer springs on more bumpy circuits. A good indication of the difference between smooth and bumpy tracks is usually older tracks will be bumpier than modern counterparts.
However, it is important to attempt to have the range as soft as possible, before a negative impact is seen, as this will help improve the grip of your car.
Within Assetto Corsa Competizione there is a very well presented interactive representation of the suspension of the car. There are three colour lines each indicating a different action of the suspension.
Red: indicates the physical bumpstop present within the suspension. Changes to the bumpstop range will affect this line.
Yellow: indicates the movement of the suspension travel. This value will be static within the pits as the car is not moving but will oscillate up and down when on track.
Green: indicates the full limit of travel the suspension can exhibit.
AI Coaching that actually works
Don't get lost in the data, instantly unlock lap time using our new real-time Auto Insights coaching. Elevate your braking, apex, and exit performance in record time.
Dampers
Dampers are related to the shock absorber found within the suspension of the car, this is what the spring surrounds. As with all cars having the correct damper settings can make the car handle much more aggressive or stable depending on your preference. So getting these values correct is crucial to building a setup.
Currently, the only way to truly understand the effects dampers have on the car is to use a piece of software known as Motec. The Coach Dave Academy has written a guide to getting your MOTEC software setup and ready to go for setting up your dampers and many other useful features.
Basic principles
There are a few basic features of a damper that need to be understood to fully understand how to create the correct setup.
- Compression: this will control the overall speed that the suspensions spring will compress at when a bump is hit by the wheel.
- Rebound: this is the speed at which the suspension will return to full extension after the suspension has compressed.
Bump
The first adjustable value within the setup menu indicates the level to which the spring will be compressed. The lower the value the faster the suspension will compress.
Fast bump
This differs from the base bump as it controls the rate of compression for quick short hits to the suspension. The lower the value the faster the suspension will compress over quick short compression.
Rebound
As mentioned this controls the rate at which the suspension returns to its original state. A lower value will allow the suspension to return to its original state faster
Fast rebound
This differs from the base rebound as it controls the rate of compression for quick short hits to the suspension. A lower value will allow the suspension to return to its original state faster after a quick short compression.
Aero
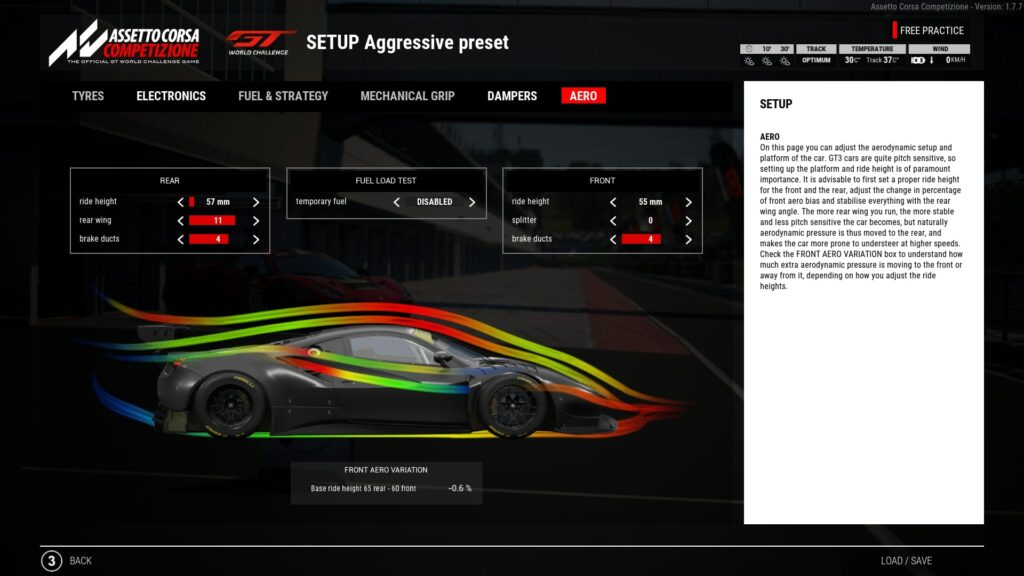
Aero is what controls the effect air moving across the body and under the car will have on the overall handling, acceleration and top speed characteristics. To fully take advantage of the aero first you need to make sure that all the previously mentioned features in the guide are to your liking.
It must be noted however when adjusting the area you must then adjust all the other parameters, particularly your suspension, to compensate for changes in the area balance.
The adjustment of area features will allow you to achieve the best front and rear end grip of your car. With this, you also want to use aero as a tool to tweak car stability, acceleration and top speed.
Ride height
Adjusting ride height will allow you to control the distance at which the floor of the car is from the ground. The lower the floor is to the ground then the more downforce is produced by the floor, effectively sucking the car to the ground. Increasing this value can cause an increase in drag which in turn will lower your car’s potential acceleration and top speed.
Rear wing
Adjustments to the rear wing will tweak the downforce levels placed upon the rear end of the car. Increasing the value of your rear wing will increase rear downforce and in turn increase understeer and decrease oversteer. Increasing this value too much will lead to increased drag and reduce acceleration and top speed.
Splitter
The front splitter does much the same as your rear wing but in the front of the car. Increasing the value of the splitter will increase oversteer and reduce understeer.
It is important to note that the rear wing and splitter are very much related to one another. You must adjust these in tandem as they can work together or negatively affect each other if not adjusted correctly.
Brake ducts
The use of a brake duct is multifaceted as it not only adjusts the aero balance of the car but also plays a role in cooling brakes and therefore tyres. The increase of the brake duct value will open up the duct and allow more air to pass through to the brakes. This in turn will mean the brakes will cool quicker and reduce the peak temperature reached.
With this in mind, brake temperature can be easily seen within the UI of Assetto Corsa Competizione through the graphical coloured brake representation. In general, the brakes should always be green to provide optimal performance. Red will indicate the brakes are too hot and blue too cold. The optimal temperature is 600°C – 650°C for the front brakes and 450°C for the rear brakes. Adjust the brake ducts to maintain green across all brakes throughout a stint or lap.
As mentioned, opening up the brake ducts will also affect the aero platform of the car as the more open they are the more drag is introduced. A higher brake duct value will lead to a generally lower top speed than a lower value.
Finding the balance between brake temperature and drag can be difficult. A good rule of thumb is at higher speed circuits reduce the brake duct value as much as possible to increase top speed. At handling focused track you are more likely to use the brakes more so open the ducts to maintain optimal brake temperatures and performance.
Now that you have a full grasp on how to set up a car you are on your way to becoming a faster more consistent driver. However, many of the skills needed to truly understand a car’s setup will take time and experience. If you are still having issues The Coach Dave Academy has many other guides and resources to help you get the most out of your car and setup. One of the most useful guides is “How to fix oversteer and understeer in ACC” and “How to set up your car for the Wet in Assetto Corsa Competizione”.
If you still are unable to master the art of setups then The Coach Dave Academy has several setups for a range of cars within Assetto Corsa Competizione. The setups have been painstakingly developed by the professional team of drivers and engineers here at The Coach Dave Academy. Setups are also continuously updated to reflected changes to the game or just to help improve stability and speed. Each purchase comes with a qualifying and race setup for the respective tracks giving you the edge over your competitors no matter the track.
- All Pro GT3, GT4, GT2 Meta Setups in ACC
- AI Coaching for Sector by Sector Gains
- Pro Reference Laps to Compare to Yours
- The Best Telemetry App to Improve Your Lap
ACC Setup Guide FAQs
Start with the safe or aggressive presets in-game. Make sure the tyre temperatures are in the right operating window of 26.5 – 27.5 psi. Then it’s all about testing. You need to decide if you want a stable setup for a long race or a loose setup for a qualifying run. You will then need to adjust cambers and toe to be more or less extreme, ride heights to be lower or higher for fuel loads and curbs and wing settings to give you more top end or corner speed. With other things like brake bias, differentials and TC settings being to your preference.
A setup guide should do more than just list values for you, it should help you understand why certain changes are made and how they affect the car. A good ACC setup guide will help you optimise a setup for specific tracks or conditions. It will give you a good setup workflow to follow. It will give you advice on what to expect when you make certain adjustments. A good setup guide may also include a hot lap to visually see how a setup performs.
This all depends on your goals for the setup and ultimately it will come down to testing the setups you have made or adjusted. For a race setup you want it to preserve tyre life, feel good in the corners and be consistent lap after lap. For a qualifying lap you want ultimate pace, you want one lap performance. You want to eek out every bit of lap time from the setup without looking at the consequences. So test. Can you repeat the same lap time for 30 straight minutes? If so it’s going to be good over a race distance. Can you produce an incredible lap that’s unrepeatable after 3 laps. If so it’s likely going to be good for qualifying.
The default game setups are not optimised for qualifying or the race. They are somewhere in between it all. You’ll do just fine in qualifying, you’ll do just fine in the race, but you won’t be the quickest in any session. That’s fine if you just want to have fun without looking at the competitive side of things or you are jumping into a daily race with no time to prep and want a stable setup to get you to the finish. A fully customised professional setup, however, is lightyears ahead and can be whole seconds faster in qualifying and race trim. This is because it is optimising every granular detail of what can be adjusted in the car.
In ACC, there is a clear META, or direction you need to go with the setups to ensure you are making the biggest impact out on track. This is to create extreme values with cambers and toe values, adjusting suspension and dampers a certain way, running a specific rake angle and wing value and using as little TC/ABS activation as possible. When all of these things are aligned and set up correctly, the lap times will tumble. For those who don’t know what these values are for every car, or don’t have time to test, you can get professional acc setups created by pro esports drivers, who’ve spent the time adjusting and testing so you don’t have to.

